If the electricity in your home cuts out while you are watching television, the screen goes black, and when the grid comes back on, the TV simply waits in standby. Nothing breaks. It is natural to assume that a small home server or Network Attached Storage (NAS) box behaves the same way—after all, modern computers use solid-state drives and resilient filesystems, so how much harm can a sudden power cut really do?
Quite a lot, as it turns out. Once you move beyond a basic router and start running your own homelab hardware with Proxmox VE, TrueNAS, Home Assistant, or a photo library like Immich, your servers are almost never truly idle. Behind the scenes, they are constantly holding recent changes in fast system RAM before committing them to disk, updating database indexes, and writing log files.
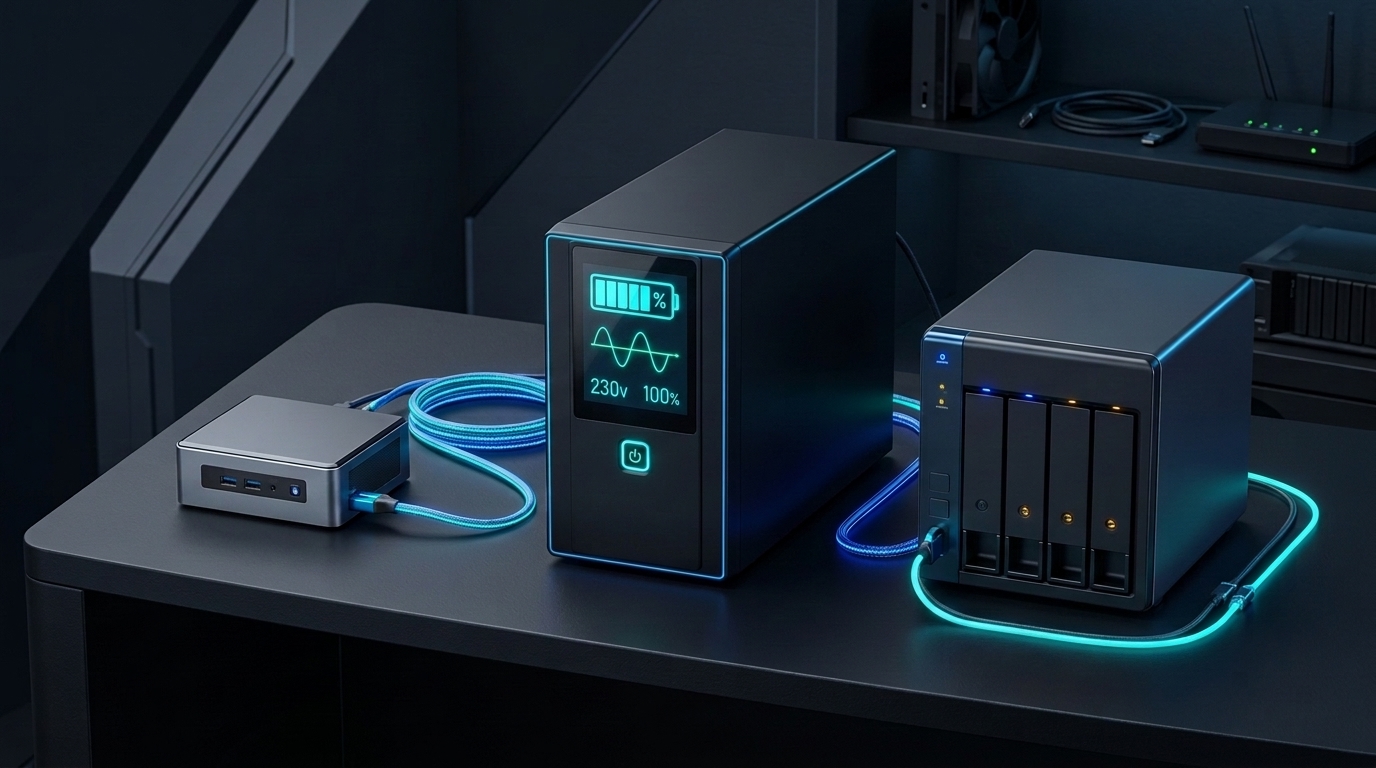
Pulling the plug on a running hypervisor or NAS is what system administrators call a dirty shutdown. Preventing one does not require an industrial generator or a data-center budget. It requires two things working together: an Uninterruptible Power Supply (UPS) to catch the power drop, and a lightweight piece of software called Network UPS Tools (NUT) to tell every server in your rack when to save its work and turn itself off cleanly.
This guide breaks down how a UPS works in plain English, what the confusing electrical ratings on the box actually mean, and how a single UPS with one USB cable can gracefully shut down both your Proxmox host and your NAS in the exact right order.
1. Why Pulling the Plug on a Server Is Different from Unplugging a TV
To understand why servers hate sudden power cuts, think of a computer's storage system like a busy bookkeeper working at a desk. The filing cabinets against the wall are your hard drives and SSDs—permanent, spacious, and relatively slow to open and close. The papers spread out across the desk are your server's volatile memory (RAM) and drive write caches—blisteringly fast, but completely dependent on electricity to exist.
When an application saves a new smart-home sensor reading or writes a chunk of a backup file, the operating system rarely stops everything to walk over to the filing cabinet immediately. Instead, it organizes those writes in memory for a few seconds so it can file them in neat, efficient batches.
When a blackout hits without battery backup, the lights go out and everything sitting on top of the desk vanishes in a millisecond:
- In-flight writes evaporate: Copy-on-write filesystems like ZFS on TrueNAS (especially when paired with ECC RAM) are engineered to keep already-committed disk blocks consistent, but any data sitting in unwritten memory buffers or in a drive's volatile cache when power disappears is lost.
- Databases risk corrupted journals: Applications like Home Assistant, Nextcloud, Vaultwarden, and media servers rely on SQLite, MariaDB, or PostgreSQL databases. If power vanishes mid-transaction while a database is updating its write-ahead log, the container may refuse to start when power returns until you repair the database or restore from Proxmox Backup Server.
- Virtual machines suffer double caching: On a Proxmox VE host running five virtual machines and ten containers, cutting wall power is like yanking the power cord out of fifteen computers at the exact same instant—while the underlying hypervisor is also mid-write.
You might wonder where other protection hardware fits in:
- A surge protector only absorbs brief high-voltage spikes (such as lightning nearby). It contains zero battery capacity; when the grid drops for even half a second, everything plugged into a surge strip dies immediately.
- Redundant power supplies inside enterprise servers protect you if one internal Power Supply Unit (PSU) fails, or if one circuit breaker trips in a data center with two independent power feeds. If both power cords are plugged into the same household wall circuit during a neighborhood blackout, both PSUs lose power simultaneously.
- Scheduled backups on Proxmox Backup Server save you after a disaster, whereas a UPS prevents the crash from happening in the first place so your homelab boots back up cleanly without requiring a restore.
2. Decoding UPS Jargon in Plain English (Without Needing an Electrical Degree)
Shopping for a UPS can feel intimidating because manufacturers plaster boxes with electrical engineering acronyms: 1500 VA / 1000 W, Line-Interactive, AVR, Simulated Sine Wave, and Active PFC. Once you translate these five terms into everyday concepts, reading a UPS spec sheet becomes straightforward.
What Is a UPS?
An Uninterruptible Power Supply (UPS) is an enclosure containing a rechargeable battery (most commonly a sealed lead-acid battery similar to a compact motorcycle battery, or lithium-iron-phosphate in newer models), an inverter that converts the battery's direct current (DC) into household alternating current (AC), and a controller that monitors incoming wall power. When wall power fails, a typical UPS switches your equipment onto battery power in a few milliseconds—fast enough that your server's power supply keeps running through the transition.
VA (Volt-Amperes) vs. Watts: The Beer-Glass Analogy
Every UPS is advertised with a headline number on the front of the box in VA (Volt-Amperes), such as 1500 VA or 500 VA, followed by a smaller number in Watts (W) in the specifications table, such as 1000 W or 300 W.
- Watts (W) measure real power—the actual working power your servers draw to spin hard drives and run processors.
- Volt-Amperes (VA) measure apparent power—the combined electrical load the UPS output circuitry must handle, including reactive current caused by magnetic components and capacitors inside AC power supplies.
Think of a freshly poured glass of beer. The liquid beer at the bottom is Watts (the real work you actually drink). The layer of foam on top is reactive overhead, and the entire glass from bottom to rim—liquid plus foam—is VA. The ratio between the two (Watts ÷ VA) is called the Power Factor, which typically sits around 0.6 on entry-level UPS units (for example, APC's 500 VA / 300 W Back-UPS RS 500) and around 0.67 to 0.9 on mid-range models (such as CyberPower's CP1500PFCLCD, rated at 1500 VA / 1000 W).
The practical rule: Never size a UPS using only the headline VA number on the box. Always look up the Watt rating and keep your homelab's normal load comfortably below that Watt limit so the inverter is not overloaded when disks spin up.
The Three UPS Topologies: Standby, Line-Interactive, and Online
Not all UPS units handle grid problems the same way. They fall into three main designs (topologies):
On a small screen, swipe sideways inside the table.
| UPS Topology | How It Works in Plain English | Best For | Homelab Verdict |
|---|---|---|---|
| Standby (Offline) | Passes wall power straight through and waits until voltage drops or fails beyond a fixed threshold, then switches over to battery. | Basic desktop accessories, LED lamps, non-critical modems. | Less suitable for servers in areas with voltage sags, because repeated brownouts force battery switches. |
| Line-Interactive (with AVR) | Includes Automatic Voltage Regulation (AVR)—an autotransformer that boosts low voltage (brownouts) or trims high voltage back toward normal without switching to battery. Switches to battery when wall power cuts out. | Proxmox servers, TrueNAS boxes, network racks, desktop PCs. | The Homelab Sweet Spot. Quiet during normal operation, efficient, and preserves battery charge for real blackouts. |
| Online (Double-Conversion) | Continuously converts incoming AC wall power into DC and continuously regenerates AC power from the inverter with zero transfer interruption. | Sensitive medical/lab gear, unstable generator power, enterprise data centers. | Usually overkill at home. Costs more, generates extra heat, often runs cooling fans continuously, and uses more electricity. |
That middle feature—AVR (Automatic Voltage Regulation)—is why Line-Interactive is the practical sweet spot for most homelabs. During a hot afternoon or a storm, household voltage often sags (a brownout) before a full blackout occurs. Without AVR, a basic Standby UPS must switch onto its battery every time the voltage dips too low, draining the battery before the real outage even begins. With AVR, a Line-Interactive UPS steps sagging voltage back up without touching the battery reserve.
Pure Sine Wave vs. Simulated (Stepped) Sine Wave
Electricity from your wall outlet flows in a smooth, continuous wave called a sine wave. When a UPS switches to battery power, its internal inverter recreates AC power from the DC battery in one of two ways:
- Simulated Sine Wave (also called Stepped or Approximated Sine Wave): Entry-level UPS units switch voltage on and off in blocky, stair-stepped rectangles rather than a smooth curve.
- Pure Sine Wave: Mid-range and server-grade UPS units generate a smooth, rounded wave that closely matches utility grid power.
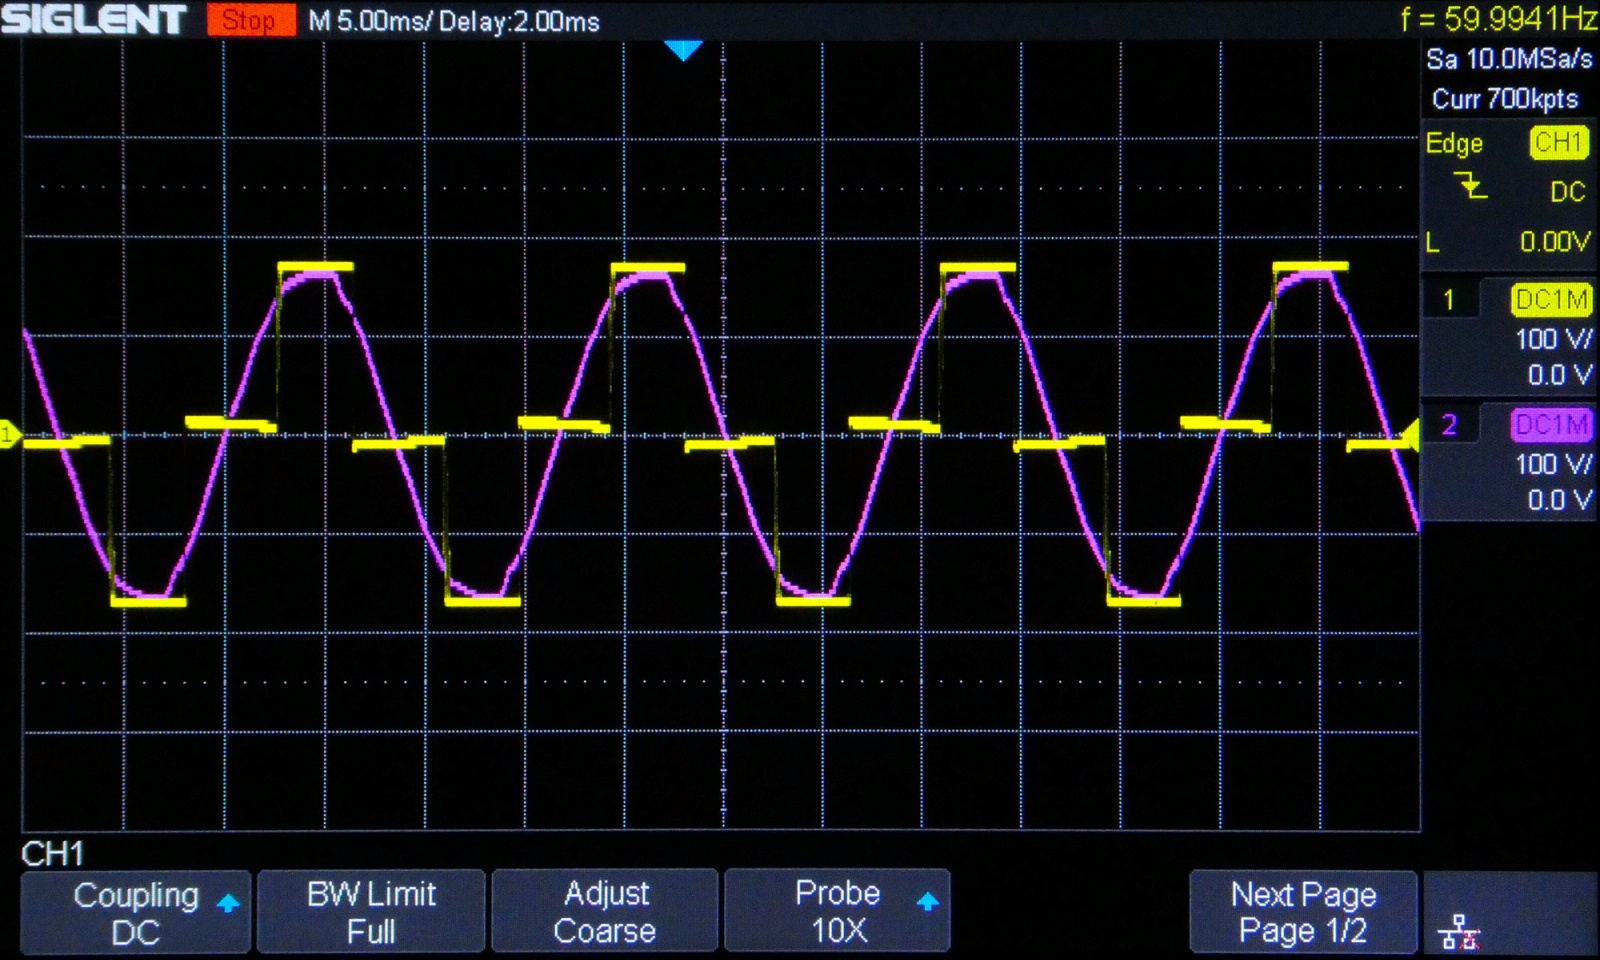
Why does the shape of the wave matter? Modern desktop and server power supply units with 80 Plus efficiency ratings commonly use Active Power Factor Correction (Active PFC) input circuitry. Some Active PFC power supplies react poorly to the abrupt zero-voltage steps in a simulated sine wave—buzzing loudly, overheating, or dropping out when the UPS transfers to battery. Manufacturers such as CyberPower explicitly design Pure Sine Wave models (like the CP1500PFCLCD) for systems with Active PFC power supplies.
3. Sizing Your Homelab UPS: How Much Battery Do You Actually Need?
A common misconception among first-time homelab builders is thinking a UPS is meant to keep servers running for hours during a storm. Compact lead-acid UPS batteries are short-term emergency buffers, not whole-home powerwalls.
The Golden Rule of Homelab UPS Sizing: You are not buying hours of runtime to keep media streaming in the dark. You are buying 10 to 20 minutes of controlled buffer—a few minutes to ride out brief grid flickers without rebooting, plus enough reserve for your servers to close their databases, flush disk caches, and shut down safely during a prolonged blackout.
How to Estimate Your Load
The most reliable way to size a UPS is to measure your equipment with a plug-in power meter or check each device's power specifications:
- Compact mini-PC Proxmox node (such as an Intel N100 or N150 system): typically draws only a few dozen watts under everyday homelab loads.
- 4-bay NAS with spinning 3.5-inch hard drives: draws steady power while reading and writing, plus a brief higher surge when all hard drives spin up simultaneously at boot.
- Core network gear (ONT, router, and Ethernet switch): adds a small continuous load that must stay powered so your servers can communicate during shutdown.
For a single mini-PC node and router, a compact 600 VA to 850 VA unit is often plenty. Once you combine a Proxmox host, a multi-bay NAS, and a network switch, stepping up to a 1000 VA to 1500 VA (600 W to 1000 W) Line-Interactive Pure Sine Wave UPS gives you comfortable wattage headroom and extra battery margin as the battery ages.
Look Closely at the Back Panel (and the Battery Bay)
Before plugging your equipment in, inspect the back panel of your UPS. Many UPS models divide their power outlets into two distinct banks:
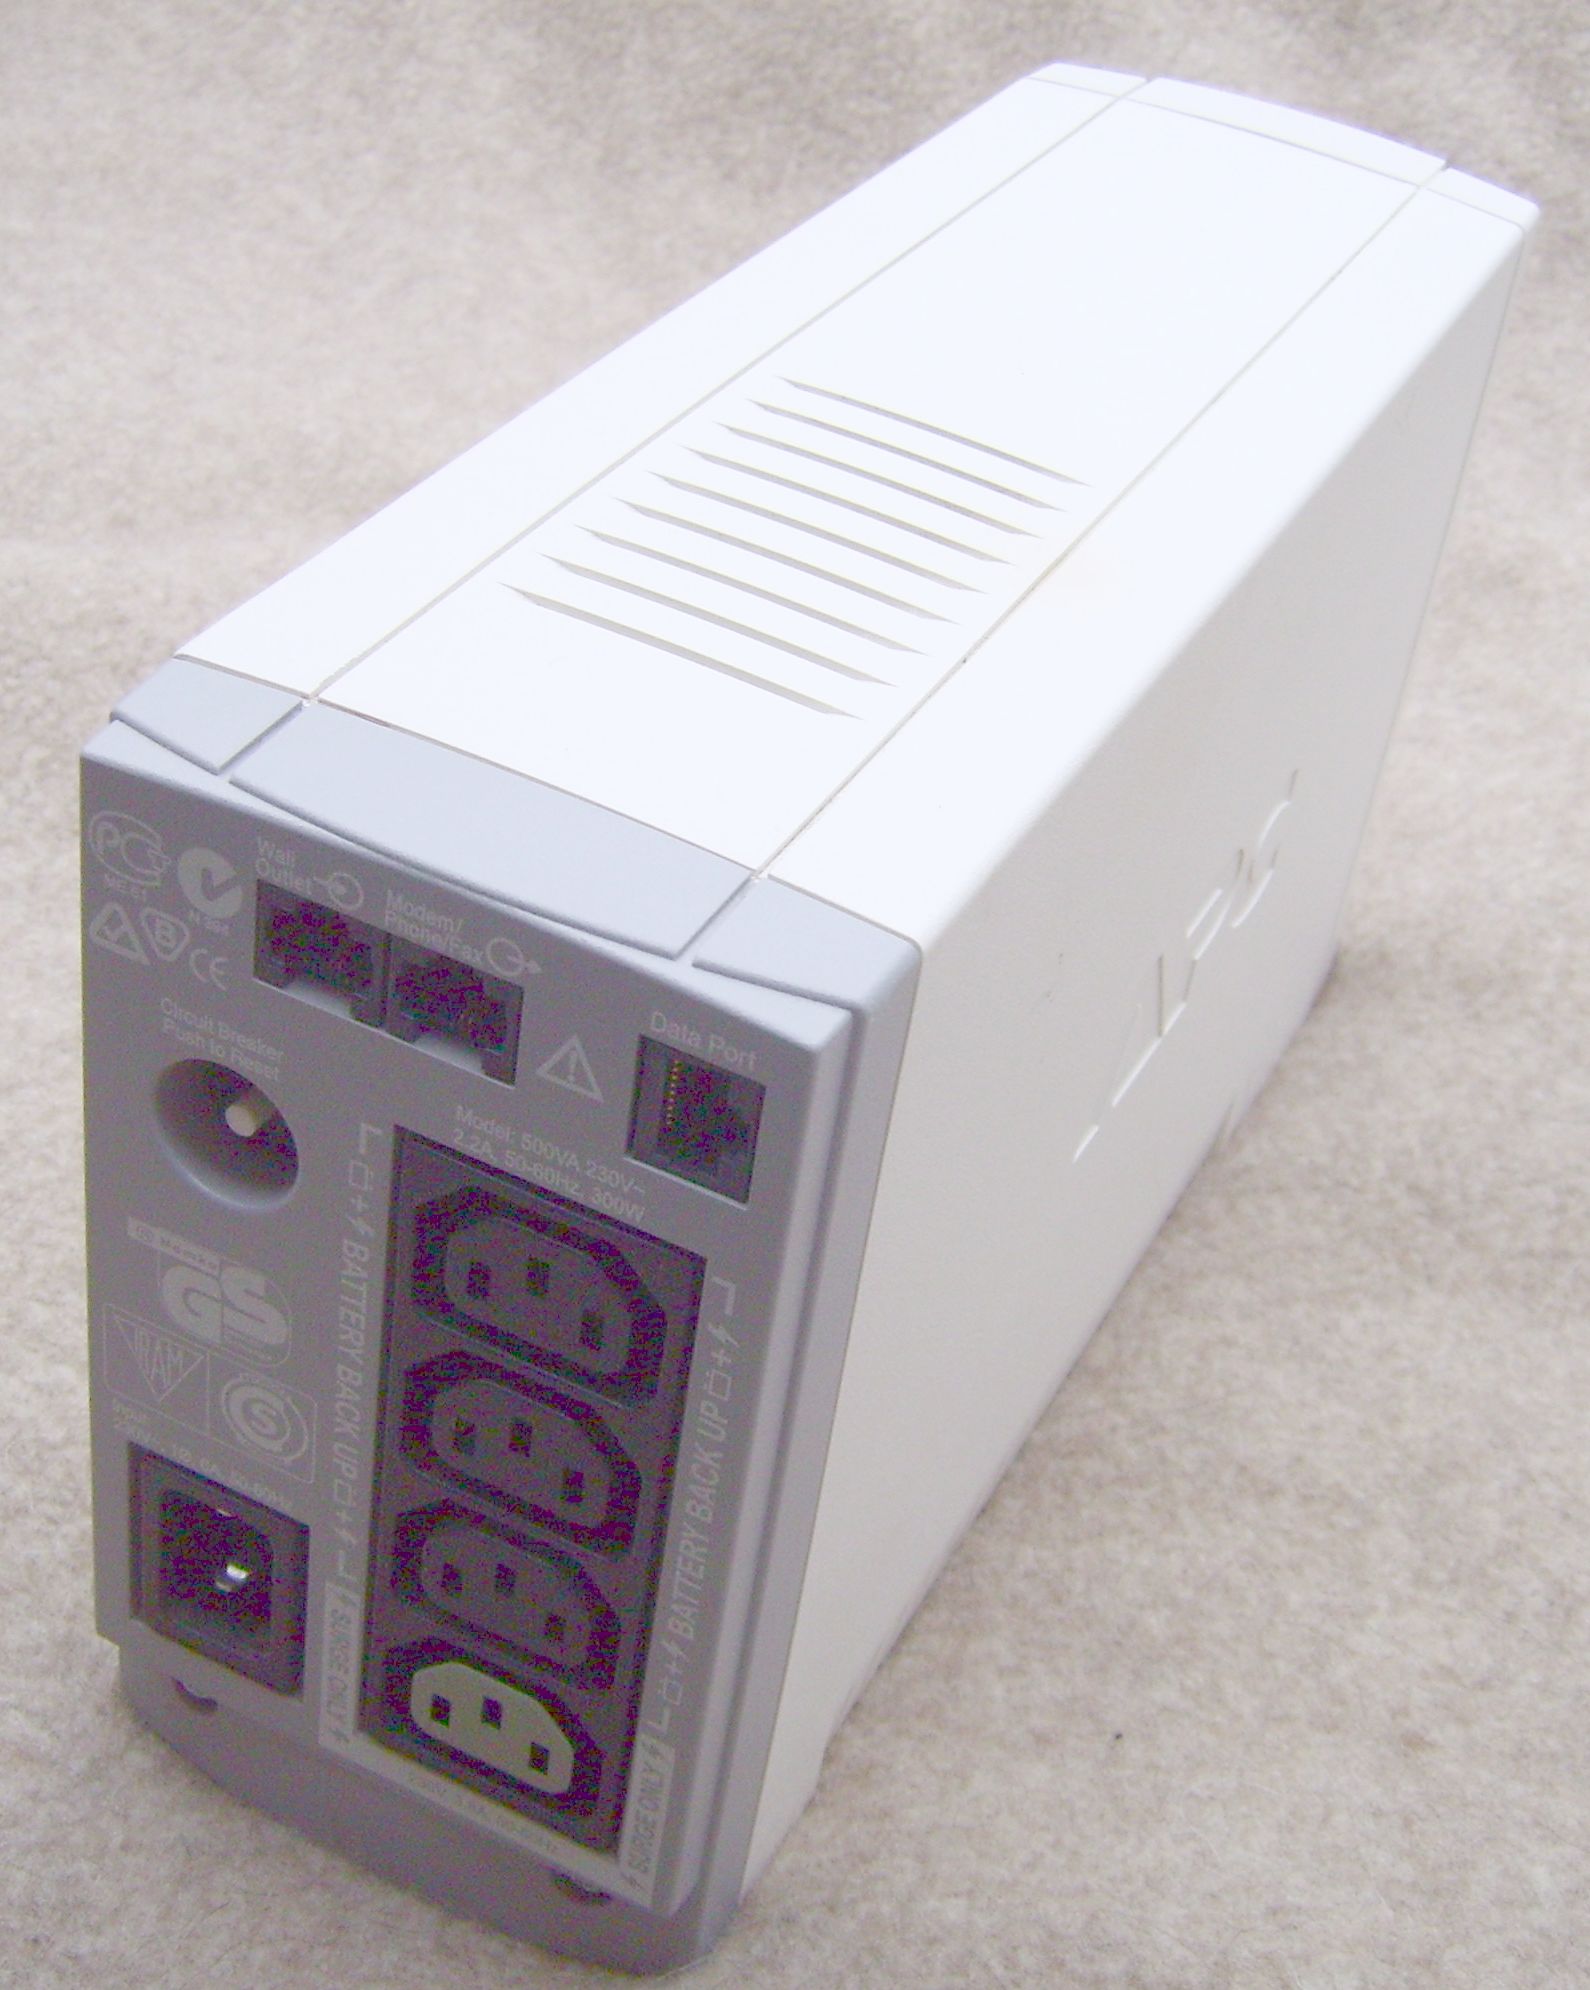
BR500I). The three upper black outlets are labeled BATTERY BACK UP, the bottom light-grey outlet is labeled SURGE ONLY, and the top-right Data Port connects the UPS to the host computer for automatic shutdown signaling. Photograph by Hundehalter on Wikimedia Commons.- Battery Backup + Surge Protection Outlets: Wired to the internal battery inverter. For example, CyberPower's CP1500PFCLCD provides 12 total outlets split into 6 Battery & Surge Protected outlets and 6 Surge-Only outlets. Plug your Proxmox host, NAS, and core network switch/router into the battery-backed outlets.
- Surge-Only Outlets: Protect against voltage spikes, but lose power immediately during a blackout so heavy accessories do not drain the battery. Plug monitors, desktop speakers, and non-essential accessories here—and never plug a laser printer into battery outlets, as its heated fuser draws huge current spikes that can overload the inverter.
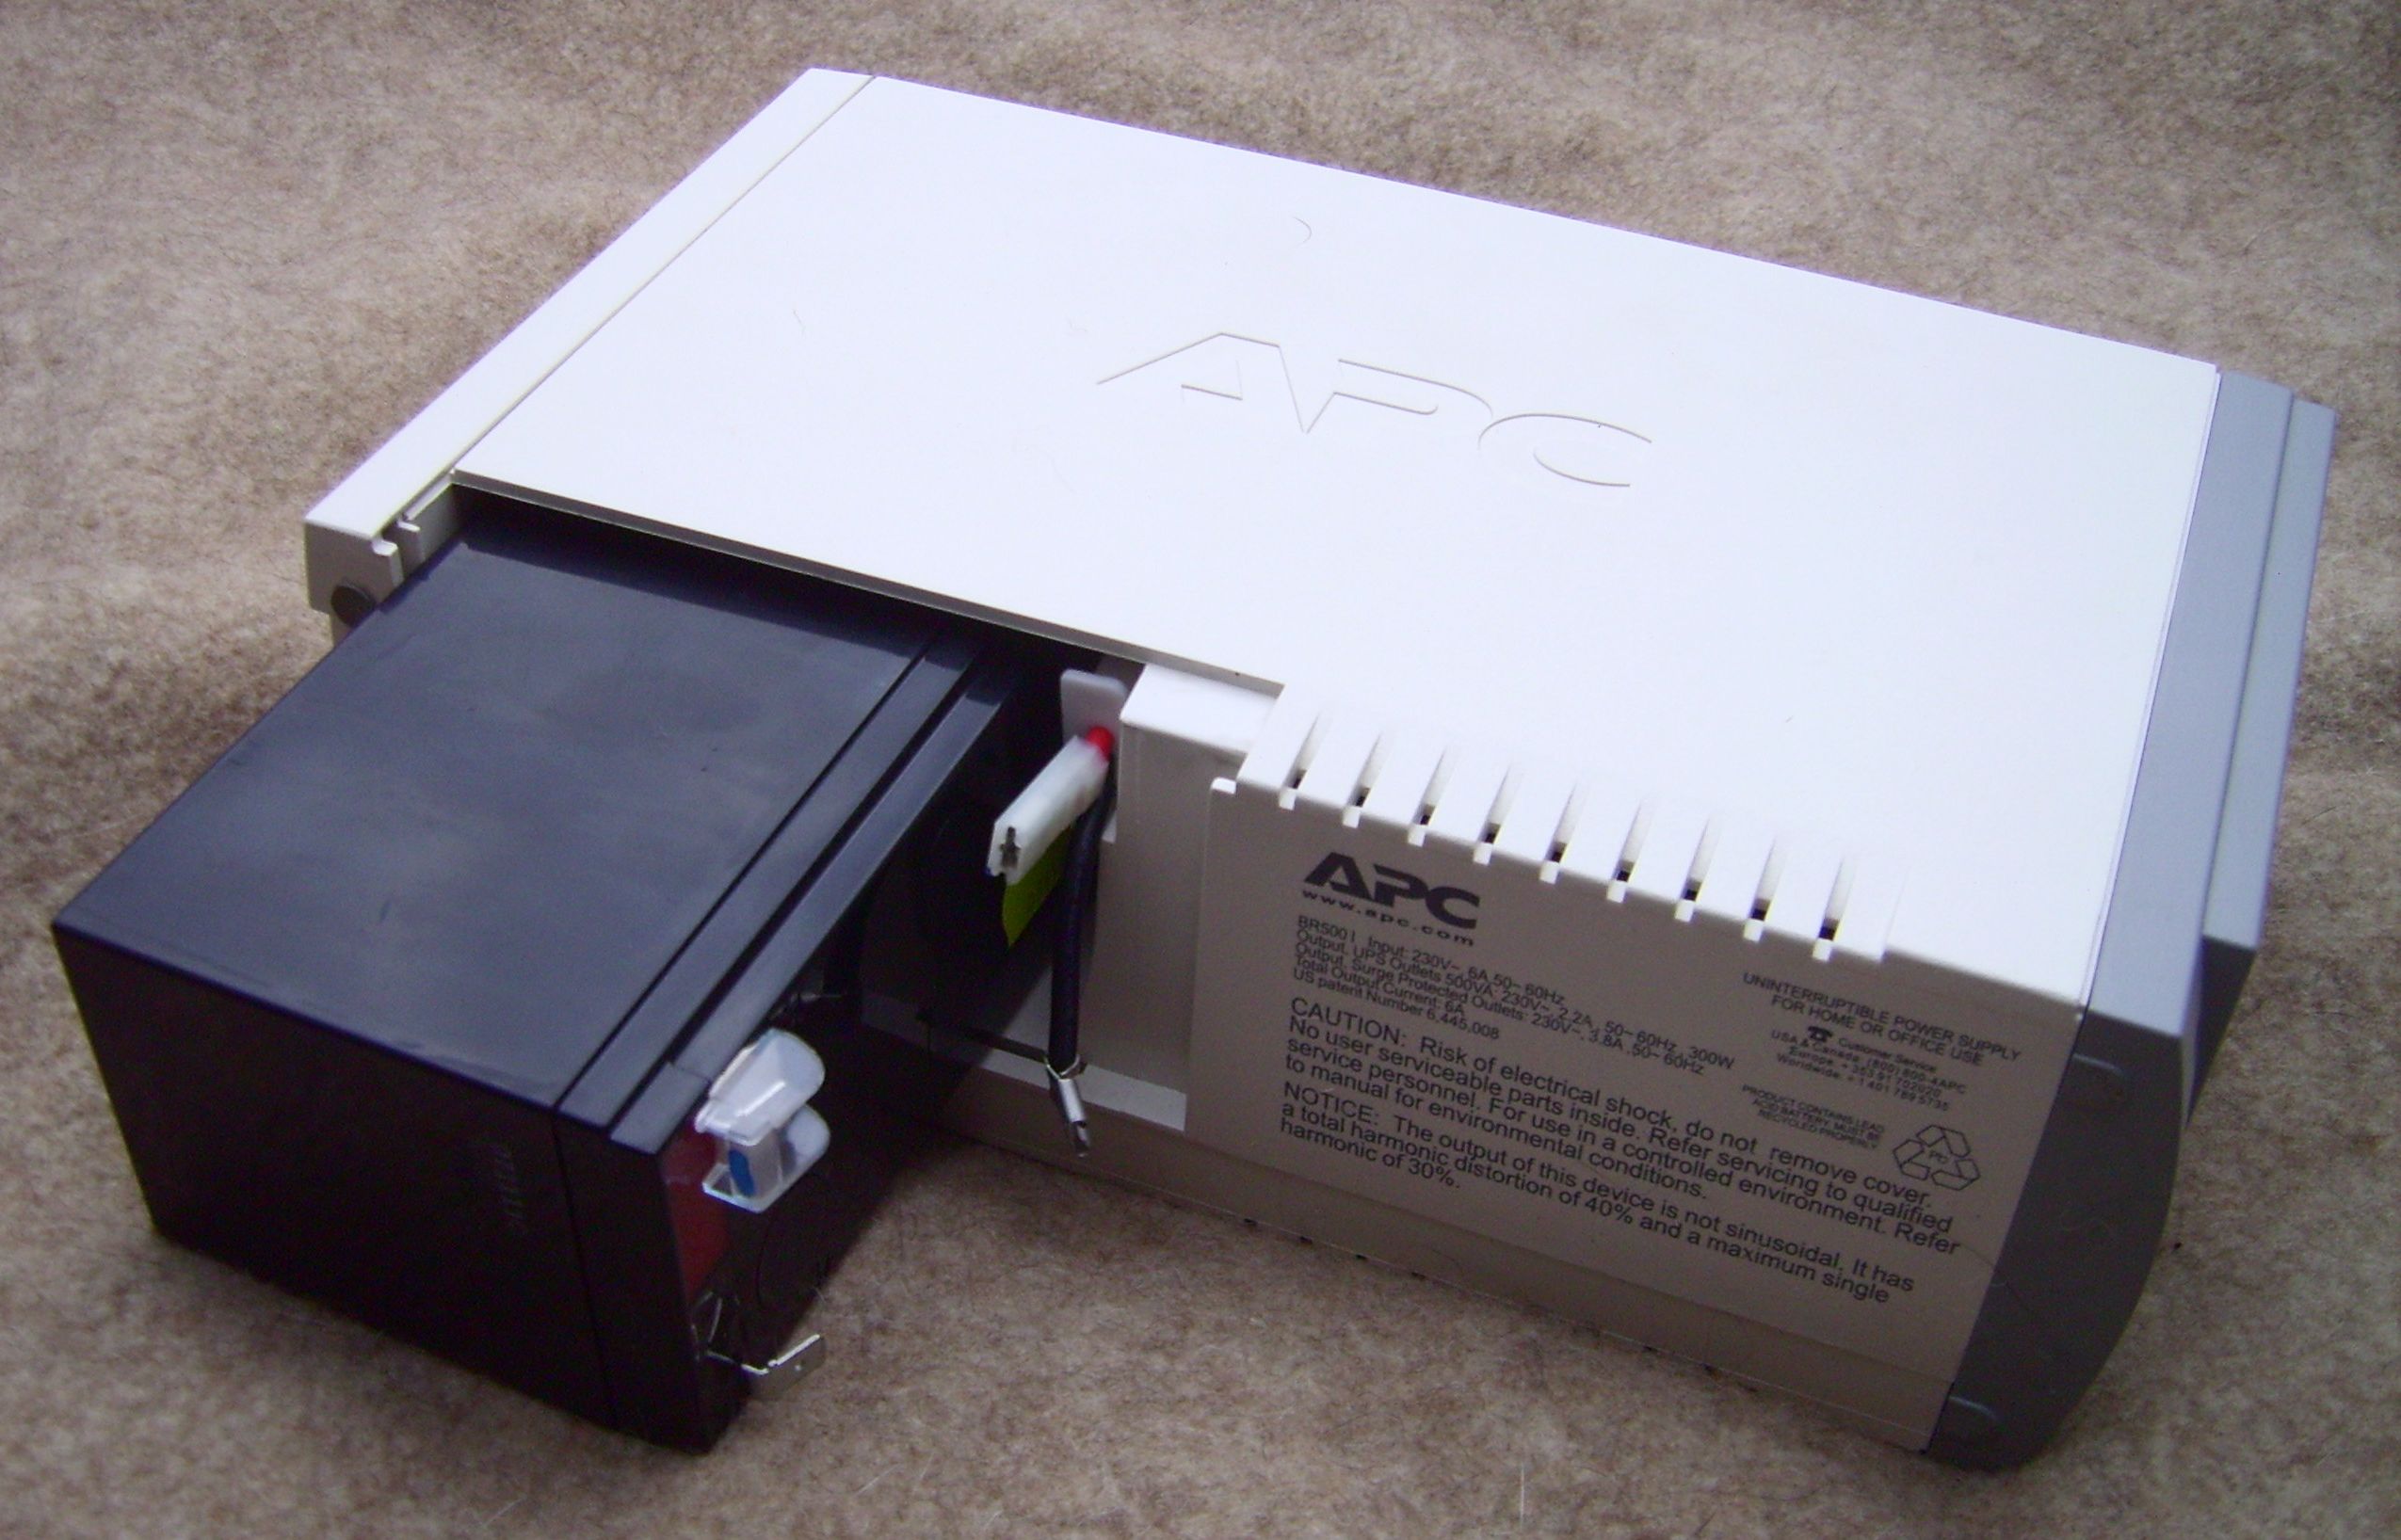
500VA / 300W on the battery outlets alongside a non-sinusoidal output notice. Photograph by Hundehalter on Wikimedia Commons.Also remember that the sealed lead-acid (SLA) battery inside a UPS is a consumable component. As the battery ages over several years, its runtime gradually shrinks. Choosing a UPS with a user-accessible battery compartment lets you slide out the tired cartridge and attach a fresh replacement battery in a few minutes without replacing the entire UPS.
4. The Secret Ingredient: How the UPS Talks to Your Servers (USB + NUT)
Here is the trap that catches many beginners: if you plug your Proxmox server and NAS into the battery outlets of a UPS, and walk away without connecting the data cable, you have not solved the dirty-shutdown problem. You have only delayed it by 15 or 20 minutes.
Without a data connection, your servers have no way of knowing that wall power has failed. As far as Proxmox and TrueNAS can tell, AC electricity is still arriving normally through the power cord. They will keep running until the UPS battery is completely exhausted—at which point the inverter cuts off and your servers suffer the exact same hard crash they would have suffered without a UPS.
Enter the Data Port and Network UPS Tools (NUT)
Every homelab-ready UPS includes a Data Port (either a USB Type-B port or an RJ45/RJ50 data jack that connects to a standard USB port on your server). Over that cable, the UPS reports live telemetry: whether wall power is present, the current battery charge percentage, and the low-battery alarm state.
On Linux, Proxmox VE, and TrueNAS, the standard software used to read that telemetry is Network UPS Tools (NUT)—an open-source monitoring system packaged in Debian (the base operating system underneath Proxmox VE) and built directly into the TrueNAS UPS service screen.
One USB Cable, Multiple Servers: Primary and Secondary Explained
A very common question is: "My UPS only has one USB data port, but I have both a Proxmox server and a separate TrueNAS box plugged into its power outlets. How do both servers know when to shut down?"
You do not need a USB splitter or a second UPS. As documented in the official nut.conf(5) and upsmon(8) manuals, NUT separates hardware communication from shutdown monitoring across three components:
- The Driver (such as
usbhid-ups): Communicates directly with the physical UPS over the USB cable. - The Data Server (
upsd): Reads state from the driver and shares it over the network (defaulting to TCP port3493). - The Monitor (
upsmon): Watchesupsdfor critical power events and executes the operating system shutdown command when required.
Using these components, you assign each computer on the UPS one of two roles:
- NUT Primary (
MODE=netserverinnut.confandprimaryinupsmon.conf; historically called Master): The machine physically connected to the UPS via the USB cable (for example, your Proxmox VE host). It runs the driver, runsupsd, and coordinates shutdown across the network. (If only one machine is powered by the UPS and no network sharing is needed, NUT providesMODE=standalone.) - NUT Secondary (
MODE=netclientinnut.confandsecondaryinupsmon.conf; labeled Slave in the TrueNAS UPS UI): Any additional server drawing power from the same UPS (such as a separate TrueNAS server). It has no USB cable attached; instead, itsupsmonclient connects to the Primary host over your local network on TCP port3493.
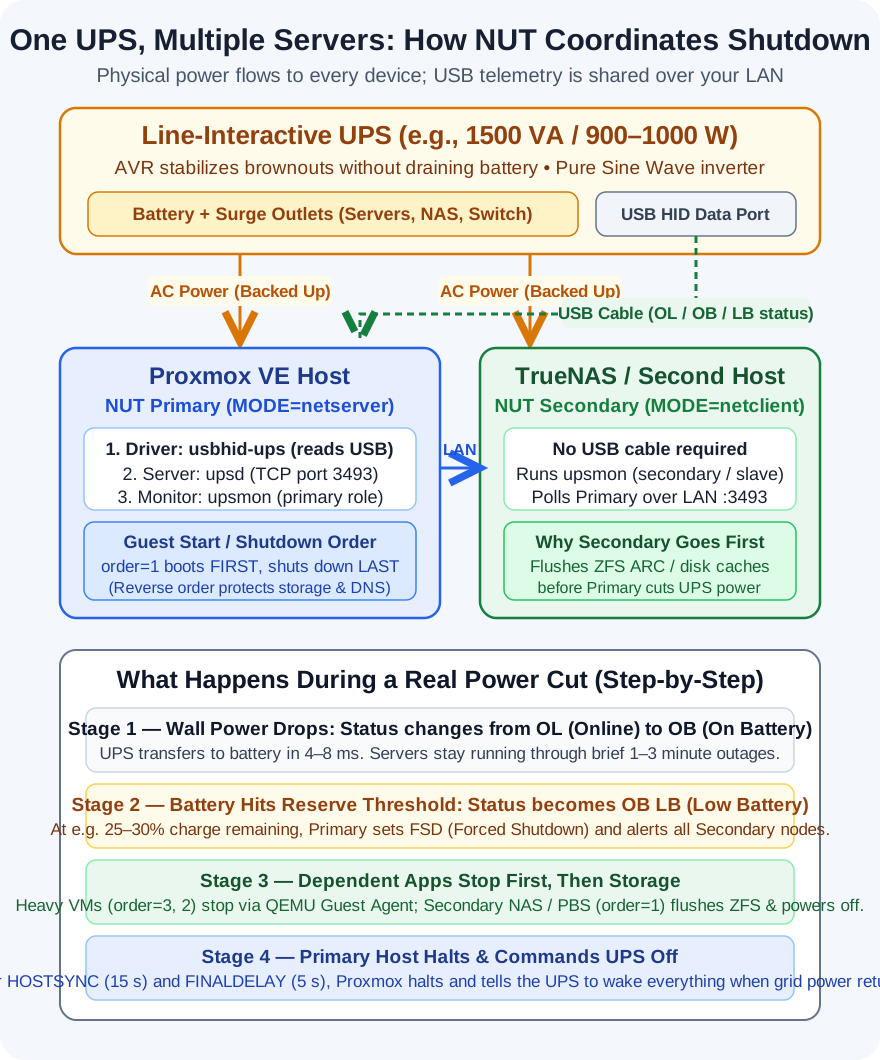
netserver) mode and shares status with TrueNAS (netclient / Slave) over TCP port 3493.The Four Status Tokens and Events That Drive Shutdown
When you query NUT or read its logs, four core states explain the entire lifecycle of a power cut:
OL(ONLINE): The UPS is running on normal utility line power.OB(ONBATT): Wall power has failed and the UPS is running on battery. By default, servers do not shut down the instantOBappears—allowing your homelab to ride through brief one- or two-minute outages without rebooting.LB(LOWBATT): The UPS battery has depleted to its low-battery threshold.FSD(Forced Shutdown): When the UPS is both on battery and low (OB LB), the NUT Primary sets theFSDflag. As documented inupsmon(8), Secondary systems shut down first as soon as they seeFSD, while the Primary waits up toHOSTSYNCseconds for secondaries to disconnect before shutting itself down last.
5. Choreographing the Graceful Shutdown (What Stops First, and Why)
When a prolonged power cut drains your UPS down to the Low Battery threshold, the order in which systems stop matters—especially when virtual machines on Proxmox VE access shared folders or virtual disks hosted on TrueNAS over NFS or SMB.
Following four practical rules ensures every layer stops cleanly without hanging:
Rule 1: Plug Your Network Switch into a Battery-Backed Outlet
Your NUT Secondary servers (such as TrueNAS) learn about the power cut by polling the NUT Primary over your local Ethernet network on port 3493. If your network switch is plugged into a wall outlet or a Surge-Only socket, the local network goes dead the instant the blackout starts—cutting off communication between the Primary and Secondary hosts. Always power your core network switch from the Battery Backup outlets on the UPS.
Rule 2: Use Proxmox's Reverse Startup/Shutdown Order
Inside Proxmox VE, every virtual machine and container has a Start/Shutdown order (order=N) setting under its Options tab. According to the official Proxmox VE Virtual Machine documentation, Proxmox always shuts guests down in the reverse of their startup order:
- Guests assigned
order=1start first when the host boots, and shut down last when the host powers off. Useorder=1for foundational infrastructure guests that other workloads rely on (such as local DNS resolvers, virtual routers, or a virtualized storage/backup appliance). - Guests assigned
order=2ororder=3start afterorder=1, and shut down first during an outage—allowing heavy databases, media servers, and application containers to close cleanly while storage and DNS are still reachable. - Proxmox also lets you set a Shutdown timeout (
down, which defaults to 180 seconds per guest if not specified) before Proxmox forcefully stops a guest that refuses to exit. When running on UPS battery, setting a sensible timeout (such as60to120seconds) prevents one hung VM from exhausting your battery. - Enable the QEMU Guest Agent option on your virtual machines (and install
qemu-guest-agentinside each guest OS) so Proxmox can request a clean operating system shutdown rather than relying solely on simulated ACPI power-button presses.
Rule 3: Coordinate Storage and Hypervisor Timing
Depending on how your homelab is wired, pick the shutdown trigger that matches your storage layout:
- Independent TrueNAS box (not hosting active Proxmox VM boot disks): Let TrueNAS run in Slave mode with Shutdown Mode set to UPS reaches low battery. When
OB LB(FSD) occurs, TrueNAS begins its shutdown immediately while Proxmox stops its local guests and waits forHOSTSYNCbefore halting last. - TrueNAS hosting active NFS/iSCSI VM disks for Proxmox: You want the Proxmox VMs using those network disks to stop before TrueNAS pulls the storage away, or you want TrueNAS to wait briefly while Proxmox guests close. You can either trigger guest shutdown earlier, or use TrueNAS's UPS goes on battery mode with a Shutdown Timer calibrated so VMs stop first and storage flushes cleanly right after.
Rule 4: Set BIOS / UEFI to Boot Automatically When Grid Power Returns
Once your servers have halted and the UPS eventually cuts power during a long blackout, what brings your homelab back online when utility power returns?
Enter each server's BIOS / UEFI Setup (typically under Power Management or APM Configuration) and change Restore on AC Power Loss (often called AC Back or After Power Loss) from Power Off to Power On or Last State. When grid electricity returns and the UPS re-energizes its outlets, your Proxmox host and NAS will automatically boot back up, and Proxmox will start your onboot=1 guests in order=1, 2, 3 sequence without manual intervention.
6. Optional Technical Reference: Minimal NUT & Proxmox Configuration Walkthrough
If your goal was to understand UPS hardware, sizing, and how graceful shutdown works conceptually, you already have everything you need above. When you are ready to configure Network UPS Tools on your own Proxmox VE and TrueNAS setup, use the reference walkthrough below.
Step 1: Connect the USB Cable and Check Detection on Proxmox
Plug the UPS USB cable into your Proxmox VE host and run lsusb in the host shell to confirm Linux detects the UPS USB interface:
lsusb
# Example output:
# Bus 001 Device 004: ID 0764:0501 Cyber Power System, Inc. CP1500 AVR UPS
# (or ID 051d:0002 American Power Conversion Uninterruptible Power Supply)
Install the nut package (which pulls in nut-server and nut-client):
apt update && apt install -y nut
Step 2: Define the UPS Driver in /etc/nut/ups.conf
As documented in ups.conf(5), each UPS gets a named section in [brackets] with required driver and port directives. Most modern USB-connected APC, CyberPower, and Eaton units use the usbhid-ups driver with port = auto:
[homelab-ups]
    driver = usbhid-ups
    port = auto
    desc = "Homelab Line-Interactive UPS"
    pollinterval = 2
(Note: Once your driver is running, you can inspect upsc homelab-ups@localhost to see the factory battery.charge.low threshold reported by your specific UPS model, and consult the ups.conf(5) and usbhid-ups(8) manual pages if you wish to override low-battery thresholds.)
Step 3: Set the NUT Operating Mode in /etc/nut/nut.conf
Edit /etc/nut/nut.conf. Per nut.conf(5), there must be no spaces around the = sign:
- Set
MODE=standaloneif this Proxmox host is the only machine powered by the UPS. - Set
MODE=netserverif a second machine (such as TrueNAS) will monitor this UPS over the network:
MODE=netserver
When using MODE=netserver, edit /etc/nut/upsd.conf so the data server listens on both localhost and your Proxmox host's LAN IP address on TCP port 3493:
LISTEN 127.0.0.1 3493
LISTEN 192.168.1.10 3493
Step 4: Configure primary and secondary Accounts in /etc/nut/upsd.users
Following upsd.users(5), create a primary monitoring user for the local Proxmox host and a secondary user for remote clients over LAN:
[upsadmin]
    password = ReplaceWithStrongPrimaryPass
    upsmon primary

[monuser]
    password = ReplaceWithStrongSecondaryPass
    upsmon secondary
Step 5: Configure /etc/nut/upsmon.conf and Verify Telemetry
In /etc/nut/upsmon.conf on the Proxmox host, add a MONITOR directive following the upsmon(8) format (MONITOR <system> <powervalue> <username> <password> <type>):
MONITOR homelab-ups@localhost 1 upsadmin ReplaceWithStrongPrimaryPass primary
Set the recommended ups.conf(5) / upsd.users(5) ownership and permissions (root:nut, mode 640) so credentials are not world-readable, restart the NUT services, and query the UPS status:
chown root:nut /etc/nut/ups.conf /etc/nut/upsd.conf /etc/nut/upsd.users /etc/nut/upsmon.conf
chmod 640 /etc/nut/ups.conf /etc/nut/upsd.conf /etc/nut/upsd.users /etc/nut/upsmon.conf
systemctl restart nut-server.service nut-monitor.service

# Verify live UPS readings:
upsc homelab-ups@localhost
# Look for:
# ups.status: OL
Step 6: Point TrueNAS at the NUT Primary Server
On a separate TrueNAS box powered by the same UPS, open the web UI and follow the official TrueNAS UPS Services Screen settings under System Settings → Services → UPS:
- UPS Mode: Select Slave (which enables the Remote Host and Remote Port fields).
- Identifier: Enter
homelab-ups(matching the section name in/etc/nut/ups.confon Proxmox). - Remote Host: Enter your Proxmox host's IP address (for example,
192.168.1.10). - Remote Port: Leave at the default
3493. - Monitor User / Monitor Password: Enter
monuserand the secondary password from/etc/nut/upsd.users. - Shutdown Mode: Choose UPS reaches low battery (or UPS goes on battery with a Shutdown Timer in seconds if you prefer timed shutdown), save, and start the UPS service.
Step 7: Configure Proxmox Guest Start/Shutdown Order
Finally, configure your critical Proxmox guests either in the web UI (Guest → Options → Start at boot and Start/Shutdown order) or via the CLI as documented in the Proxmox QM manual:
# Foundational VM (order=1 starts FIRST at boot, shuts down LAST during an outage):
qm set 101 -onboot 1 -startup order=1,up=30,down=120 -agent 1

# Application VM (order=2 starts SECOND at boot, shuts down FIRST during an outage):
qm set 102 -onboot 1 -startup order=2,up=15,down=90 -agent 1
Before relying on your setup in a real storm, test the communication path safely: plug a desk lamp into the UPS battery outlets while keeping your servers on a separate wall socket for the initial test, unplug the UPS from the wall, and confirm with upsc homelab-ups@localhost that ups.status switches from OL to OB and both hosts log the event cleanly.